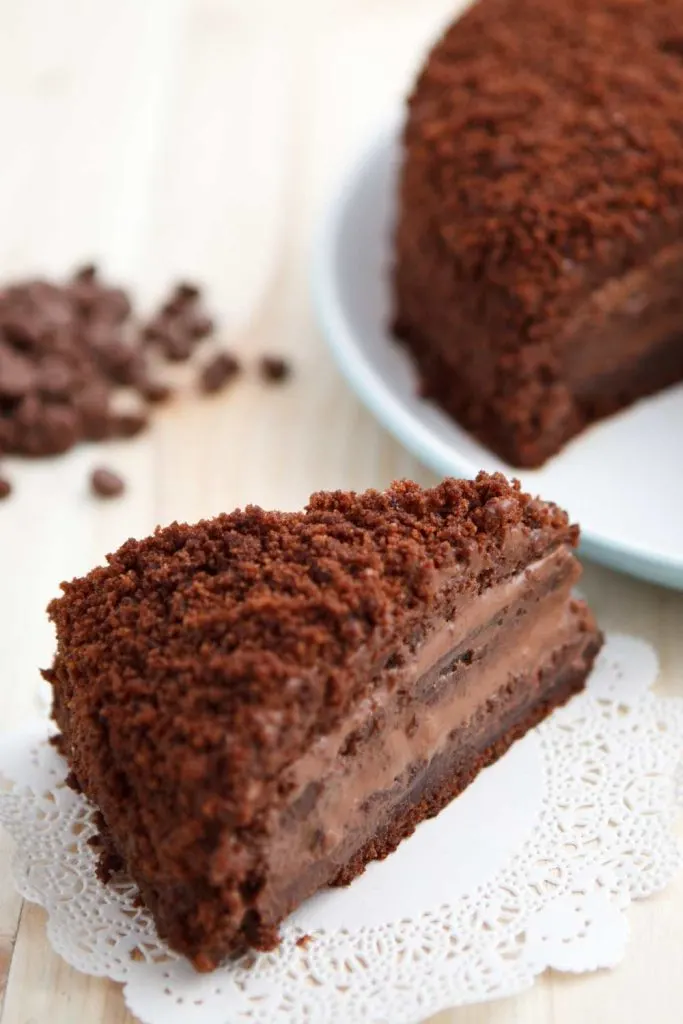
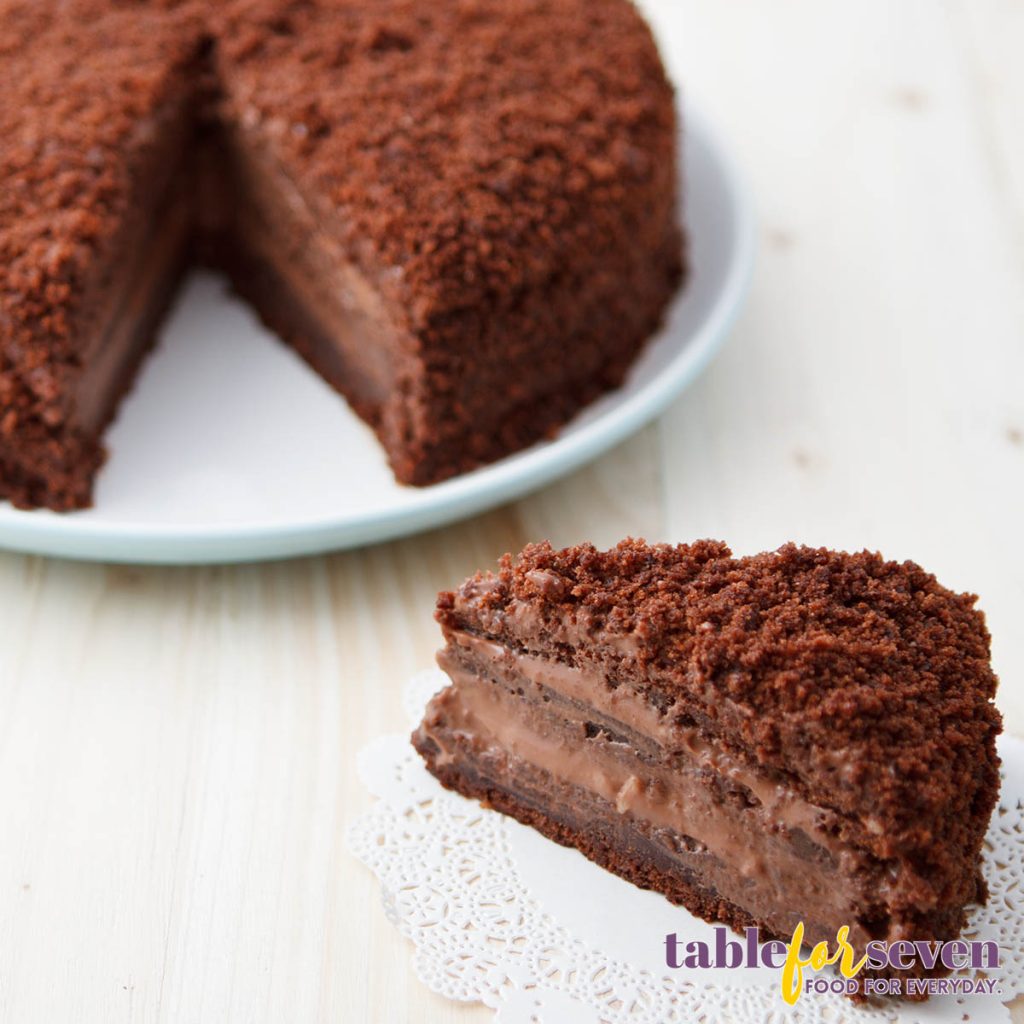
Layers of tender chocolate cake are separated by a layer of velvety chocolate pudding in this recipe for blackout cake from the Cheesecake Factory. Luxury at the tip of your fork. Not only is it simple to make vegan, but it’s also free of gluten, nuts, eggs, and dairy. This is the perfect dessert for all you chocolate lovers out there!!


Why You’ll Love This Recipe
- It’s Decadently Rich And Deliciously Creamy. The blackout cake recipe from the cheesecake factory uses both cocoa and semisweet chocolate, which gives the cake a rich, deep chocolate flavor. This recipe is a keeper because it strikes the ideal balance between the decadent chocolate filling and the tender cake.
- It’s Simple To Prepare. This blackout cake recipe from the cheesecake factory is quite easy to create because of the clear and concise directions provided. A few simple ingredients, a mixer, and some baking pans are all that are required.
- It Looks Beautiful. Make this stunning-looking cake by following the recipe’s instructions for rich, dark chocolate icing. It may be enjoyed on any occasion, whether it is a celebration or just a night in with loved ones.
Cheesecake Factory Blackout Cake Ingredients
- Gluten-Free Flour. Use a brand that is manufactured in a nut-free environment if you, too, are allergic to nuts. This gluten-free flour is my go-to since it contains dairy yet is nut-safe, which is why I enjoy using it so much. It also includes the ingredient xanthan gum, which is essential for giving baked products their characteristic springiness.
- White Vinegar. This is used with milk to create buttermilk.
- Vegetable Oil. Oil, not butter or vegan baking stick, is what keeps this cake moist.
- Cocoa Powders. If you can only use one, go with dutch or natural unsweetened, but I recommend using both.
- Cornstarch Water. Since there are no eggs in this cake, this helps everything stick together.
- Chocolate Chips. Use only gluten-free, vegan chocolate chips to maintain a vegan diet. These chocolate chips are great for people with food allergies.
What Is The Difference Between Blackout Cake And Chocolate Cake?
The use of a different kind of chocolate is the primary distinction between blackout cake and regular chocolate cake. Whereas traditional chocolate cakes use either semisweet or milk chocolate, blackout cakes use dark chocolate. Additionally, blackout cake often has a much deeper and more powerful chocolate flavor than chocolate cake due to dark chocolate. Finally, chocolate ganache frosting is the standard above a blackout cake, whereas buttercream is the standard atop a chocolate cake.
Is Blackout Cake Gluten-free?
Although gluten-free flour is used to create blackout cake, there are still additional gluten-containing components, such as cocoa powder, baking powder, and baking soda that must be taken into account.
How Do You Make A Vegan Blackout Cake?
You can make a vegan blackout cake by replacing eggs and dairy with non-dairy and egg-free options. Substitute flax eggs or a mixture of baking soda and vinegar for the eggs. You may use nut or oat milk for the cow’s milk in any recipe calling for it. You should also replace the butter with vegan butter or vegan margarine. In the end, the cake’s batter and icing may be made with vegan chocolate.

How To Make Cheesecake Factory Blackout Cake
- Using a spoon, thoroughly blend the cornstarch and the 3 tablespoons of cold water in a small bowl. Initially, it will be thick and sticky. Set aside.
- Bring 2 cups of water to a boil (you can do this in a microwave-safe bowl or measuring cup as well).
- Pour the boiling water into the cocoa powder in a saucepan over low heat on the stovetop. Whisk to mix ingredients.
- Stir in the sugar and chocolate chunks while continuing to stir.
- Whisk the cornstarch-water combination into the chocolate-water mixture in a saucepan. Continue to whisk. Add the salt and bring to a boil while continuously stirring. It ought to be thickening. If not, slowly raise the heat, being cautious not to burn the food. Allow it to boil for about one minute while constantly stirring.
- Whisk in the vanilla and butter or vegan baking stick after removing the pan from the heat.
- Leave the pan on a chopping board on the counter and stir the pudding intermittently until it has considerably cooled.
- Then, transfer to a dish that is heat-safe and chill.
- When assembling the cake, the pudding must be thick and chilly. Make sure the pudding is made in advance and chilled in the refrigerator.
Make the cake
- Preheat oven to 350 degrees Fahrenheit. Grease two round cake pans 8 inches in diameter with vegetable oil, line the bottoms with parchment paper, and then grease the parchment paper with vegetable oil.
- In a large bowl, whisk the gluten-free flour, sugar, cocoa powder, baking powder, baking soda, and salt until smooth.
- Pour one cup of the desired milk into a measuring cup. Stir in one tablespoon of white vinegar with a spoon into the mixture. Allow to rest for 5 to 10 minutes, then stir again. It should appear rather bulky. That is typical.
- In a second small bowl, stir together the cornstarch and 6 tablespoons of water with a spoon until the mixture is thin and watery. Initially, it will be thick and sticky. Set aside.
- In the middle of the dry ingredients, make a well. Add the mixture of cornstarch and water, milk and vinegar, warm water, oil, and vanilla. Blend until smooth. If it begins to get too thick, combine the remainder with a spatula.
- Evenly distribute the batter between the two oiled cake pans.
- Bake the cakes on the oven’s center rack for approximately 47.50 minutes, or until they bounce back when gently pressed.
- Allow to cool thoroughly in the cake pans. Remove from pans and transfer to cooling racks.
- Using a cake knife, remove a tiny layer off the tops of each cake layer once they have cooled to make them level and flat.
- Take the leftover cake pieces and shred them into crumbs. Set aside.
Make the chocolate frosting
- In the large bowl of an electric mixer or by hand, cream the butter or vegan baking stick until smooth and creamy. About 2 minutes.
- While the mixer is operating at a very low speed, gradually add the confectioners’ sugar.
- While the mixer is still on low speed, add the chocolate powder.
- Add vanilla and beat until incorporated.
- While the mixer is running, gradually add water until the required consistency is reached. You may not require all of the water.
Assembling the cake
- Place one cake layer on the bottom of a cake stand or dish. Place a portion of the frosting in a pastry bag and use it to create a ring around the cake’s rim. This prevents the pudding from leaking out.
- Place approximately three-quarters of the pudding in the middle of the frosting ring.
- Place the second cake layer on top, bottom side up, to create a level top.
- Apply a thin layer of the fudge frosting to the top of the cake and a thin coating to the sides using an icing spatula. This is our crumb layer, which prevents the pudding from oozing out.
- Place the entire cake in the refrigerator for 15 to 20 minutes, uncovered. This will make it easier to manipulate.
- Remove the cake from the refrigerator and continue frosting. First, coat the sides a second time, and then quickly push chocolate cake crumbs into the wet frosting so that they adhere.
- Frost the cake’s surface. You may also press crumbs onto the top, but I prefer to push a handful or two into the middle.
- If desired, pipe more frosting swirls around the cake’s top.
- If the cake will not be served immediately, chill it again and remove it from the refrigerator 15 to 20 minutes before serving.
What To Serve With Blackout Cake?
- Sweetened Whipped Cream. This light and airy frosting go wonderfully with a dense and rich blackout cake. You may whip some up with some heavy cream, powdered sugar, and vanilla. Cream and sugar should be whipped until soft peaks form; after that happens, the vanilla extract should be added and the mixture whipped until firm peaks form. Spread the whipped cream on top of each serving of cake for a sumptuous final touch.
- Ice Cream. A traditional complement to blackout cake is ice cream. Pick anything that goes well with chocolate, such as vanilla, coffee, or a decadent mocha. As a bonus, serve ice cream on top of each piece of cake. A delicious dessert.
- Caramel Sauce. Add some sweetness and shine to your blackout cake with some caramel sauce. To prepare caramel sauce, combine butter, brown sugar, and heavy cream in a saucepan. Bought a wide selection.
- Chocolate Shavings. For a more refined presentation, put some chocolate shavings on top of the cake. Curls of dark or semi-black hair can be shaved with a vegetable peeler. Each piece is drenched in a sweet chocolate sauce.
Recipe Variations
- Caramel Apple Blackout Cake. Chocolate cake layered with apple butter and frosted with caramel frosting and sprinkled with toasted walnuts is the basis for this delectable twist.
- Chocolate Orange Blackout Cake. Layers of decadent chocolate cake are separated by acidic orange curd in this inventive take on the traditional blackout cake, which is then frosted with orange buttercream and finished with a sprinkling of dark chocolate curls.
- Peanut Butter Chocolate Blackout Cake. Layers of chocolate cake are sandwiched between peanut butter frosting and a rich chocolate ganache before being finished with a sprinkling of chopped roasted peanuts.
- Coconut Lime Blackout Cake. Moist chocolate cake packed with acidic lime curd is sandwiched between layers of coconut frosting and topped with toasted coconut flakes for an irresistible taste combination.
- Blackberry Cheesecake Blackout Cake. With this delectable twist, chocolate cake layers are stuffed with a rich blackberry compote before being frosted with a light and airy cream cheese icing and garnished with fresh blackberries.
How To Store Blackout Cake?
- In The Fridge. It’s best to keep blackout cakes in an airtight container or firmly wrapped in plastic and store them in a cold, dry area. A cake containing a filling, such as custard or another type of filling, needs to be refrigerated until it can be served. If there is no filling in the cake, you may keep it for a few days in the fridge or up to a month in the freezer. Allowing the cake to cool fully before covering it helps prevent moisture from forming and making the cake mushy when refrigerated.
- In The Freezer. For up to one month, blackout cakes keep well in the freezer. Wrap the cake carefully in plastic wrap when it has cooled completely. It’s best to cover the cake in plastic wrap and then store it in an airtight container in the freezer. The cake should be thawed overnight in the fridge or at room temperature for several hours before serving.
- To Reheat. When reheating a blackout cake, a low-temperature setting works best. In-oven temperature. Put the cake on a baking sheet and bake it for 3 hours at 325 degrees Fahrenheit. Cakes usually take about 10–15 minutes to bake. It may be necessary to bake the cake for an extra 5 minutes with the foil on if the middle is still a little cool. When rewarming a custard, for instance. If you’re making a filled cake, covering the top with foil will keep the custard from drying out.
Cheesecake Factory Blackout Cake Recipe Nutrition Facts
Amount Per Serving
- Calories 464.9
- Total Fat 14.2g
- Saturated Fat 8.5g
- Cholesterol 63.2mg
- Sodium 147.3mg
- Potassium 175.9mg
- Total Carbohydrate 86.8g
- Dietary Fiber 3.6g
- Sugars 64.6g
- Protein 4.9g
- Vitamin A 9.9%
- Vitamin C 0%
- Calcium 5.5%
- Iron 9.4%


Cheesecake Factory Blackout Cake Recipe
Description
Layers of tender chocolate cake are separated by a layer of velvety chocolate pudding in this recipe for blackout cake from the Cheesecake Factory. Luxury at the tip of your fork. Not only is it simple to make vegan, but it’s also free of gluten, nuts, eggs, and dairy. This is the perfect dessert for all you chocolate lovers out there!!
Ingredients
For the Pudding
For the Cake
For the Frosting
Instructions
- Using a spoon, thoroughly blend the cornstarch and the 3 tablespoons of cold water in a small bowl. Initially, it will be thick and sticky. Set aside.
- Bring 2 cups of water to a boil (you can do this in a microwave-safe bowl or measuring cup as well).
- Pour the boiling water into the cocoa powder in a saucepan over low heat on the stovetop. Whisk to mix ingredients.
- Stir in the sugar and chocolate chunks while continuing to stir.
- Whisk the cornstarch-water combination into the chocolate-water mixture in a saucepan.
- Continue to whisk. Add the salt and bring to a boil while continuously stirring. It ought to be thickening. If not, slowly raise the heat, being cautious not to burn the food. Allow it to boil for about one minute while constantly stirring.
- Whisk in the vanilla and butter or vegan baking stick after removing the pan from the heat.
- Leave the pan on a chopping board on the counter and stir the pudding intermittently until it has considerably cooled.
- Then, transfer to a dish that is heat-safe and chill.
- When assembling the cake, the pudding must be thick and chilly. Make sure the pudding is made in advance and chilled in the refrigerator.
- Preheat oven to 350 degrees Fahrenheit. Grease two round cake pans 8 inches in diameter with vegetable oil, line the bottoms with parchment paper, and then grease the parchment paper with vegetable oil.
- In a large bowl, whisk the gluten-free flour, sugar, cocoa powder, baking powder, baking soda, and salt until smooth.
- Pour one cup of the desired milk into a measuring cup. Stir in one tablespoon of white vinegar with a spoon into the mixture. Allow to rest for 5 to 10 minutes, then stir again. It should appear rather bulky. That is typical.
- In a second small bowl, stir together the cornstarch and 6 tablespoons of water with a spoon until the mixture is thin and watery. Initially, it will be thick and sticky. Set aside.
- In the middle of the dry ingredients, make a well. Add the mixture of cornstarch and water, milk and vinegar, warm water, oil, and vanilla. Blend until smooth. If it begins to get too thick, combine the remainder with a spatula.
- Evenly distribute the batter between the two oiled cake pans.
- Bake the cakes on the oven’s center rack for approximately 47 – 50 minutes, or until they bounce back when gently pressed.
- Allow cooling thoroughly in the cake pans. Remove from pans and transfer to cooling racks.
- Using a cake knife, remove a tiny layer off the tops of each cake layer once they have cooled to make them level and flat.
- Take the leftover cake pieces and shred them into crumbs. Set aside.
- In the large bowl of an electric mixer or by hand, cream the butter or vegan baking stick until smooth and creamy. About 2 minutes.
- While the mixer is operating at a very low speed, gradually add the confectioners’ sugar.
- While the mixer is still on low speed, add the chocolate powder.
- Add vanilla and beat until incorporated.
- While the mixer is running, gradually add water until the required consistency is reached. You may not require all of the water.
- Place one cake layer on the bottom of a cake stand or dish. Place a portion of the frosting in a pastry bag and use it to create a ring around the cake’s rim. This prevents the pudding from leaking out.
- Place approximately three-quarters of the pudding in the middle of the frosting ring.
- Place the second cake layer on top, bottom side up, to create a level top.
- Apply a thin layer of the fudge frosting to the top of the cake and a thin coating to the sides using an icing spatula. This is our crumb layer, which prevents the pudding from oozing out.
- Place the entire cake in the refrigerator for 15 to 20 minutes, uncovered. This will make it easier to manipulate.
- Remove the cake from the refrigerator and continue frosting. First, coat the sides a second time, and then quickly push chocolate cake crumbs into the wet frosting so that they adhere.
- Frost the cake’s surface. You may also press crumbs onto the top, but I prefer to push a handful or two into the middle.
- If desired, pipe more frosting swirls around the cake’s top.
- If the cake will not be served immediately, chill it again and remove it from the refrigerator 15 to 20 minutes before serving.
Make the Pudding
Make the cake
Make the chocolate frosting
Assembling the cake
Notes
- Caramel Apple Blackout Cake. Chocolate cake layered with apple butter and frosted with caramel frosting and sprinkled with toasted walnuts is the basis for this delectable twist.
- Chocolate Orange Blackout Cake. Layers of decadent chocolate cake are separated by acidic orange curd in this inventive take on the traditional blackout cake, which is then frosted with orange buttercream and finished with a sprinkling of dark chocolate curls.
- Peanut Butter Chocolate Blackout Cake. Layers of chocolate cake are sandwiched between peanut butter frosting and a rich chocolate ganache before being finished with a sprinkling of chopped roasted peanuts.
- Coconut Lime Blackout Cake. Moist chocolate cake packed with acidic lime curd is sandwiched between layers of coconut frosting and topped with toasted coconut flakes for an irresistible taste combination.
- Blackberry Cheesecake Blackout Cake. With this delectable twist, chocolate cake layers are stuffed with a rich blackberry compote before being frosted with a light and airy cream cheese icing and garnished with fresh blackberries.
Servings 12
- Amount Per Serving
- Calories 464.9
- % Daily Value *
- Total Fat 14.2g22%
- Saturated Fat 8.5g43%
- Cholesterol 63.2mg22%
- Sodium 147.3mg7%
- Potassium 175.9mg6%
- Total Carbohydrate 86.8g29%
- Dietary Fiber 3.6g15%
- Sugars 64.6g
- Protein 4.9g10%
- Vitamin A 9.9 IU
- Vitamin C 0 mg
- Calcium 5.5 mg
- Iron 9.4 mg
* Percent Daily Values are based on a 2,000 calorie diet. Your daily value may be higher or lower depending on your calorie needs.